How to Use the Notification Area

As we learnt previously, the Windows 10 Notification Area is in the bottom right-hand side of the Desktop.

Windows Desktop
Your version probably does not have the red Text all over it!

There are many useful features available here, but the Default Setting is to hide most of it. I shall explain here how to un-hide the Icons, so that you can see what is going on, and access the features!

The “View Hidden Icons” button

At the left-hand side of the Notification area, you should see the “View Hidden Icons” button. It looks like an upwards-pointing arrow, or chevron.
(You may have the “People” icons next to it. You can safely ignore this)

Clicking this button will temporarily reveal the rest of your Notification Icons. but if you wish to have them permanently available, you will have to delve into the Settings area. This is not as scary as it sounds, and I shall guide you through the steps.

First, right-click on the Arrow, to show the Taskbar Menu:

Now, click on “Taskbar Settings” to open the settings window. You may have to scroll down this window a little way, to find the Notification Area section. Here there will be an entry “Select which Icons appear on the Taskbar”. Click this to move to the next stage.

This next window will have lots of different Entries, but we can ignore them all, apart from the very first section, labelled “Always show all icons in the Notification Area”. There is an “Off/On” button here, which you can ‘toggle’ by clicking it.

Try clicking it, while watching the Notification area. You should notice the icons appear and disappear!

With the button set “On”,, and the Icons showing, you can now close all of the Settings windows (using the “X” in the top right-hand corner).

Your Notification Area will now always show all of the Icons!

So Now What?

Well, it depends what Icons you have! Each system is set up slightly differently, and no two computers are the same!

There are some common elements, though, and I shall give you a brief tour through my Icons!

“System Notifications” will show if Windows wishes to tell you anything. Clicking it will reveal the message.

The Clock is pretty self-explanatory

Language Settings can be used if you wish to have Windows use a different language! (Note: There is a bug that sometimes switches it to USA English! Here is where you switch it back to UK English)

The Network Icon shows if you are connected to a network (If it is WiFi, it will show radio-waves). A Red Cross or Yellow Triangle is an indication that there is an Error on the Network.

Speaker Volume is controlled by clicking the Speakers Icon. You can see here that mine are on “Mute”.

Icons can always be clicked to call up their Menu, depending which Icon they are, and this gives you access to their settings.

So now you know!

Mostly, you will not need these Icons, but I find it very useful to be able to see them. If you prefer to hide them, you can follow the instructions above, and choose to Hide them.

How to Organise Your Desktop

We know what our Desktop is,  and what all the parts of it do, but wouldn’t it be nice if we could personalise it? Just like you can arrange your desk at work, make room for the things you use most, add ornaments, and photographs of loved ones, you can do the same with your Computer Desktop!

The default Windows 10 Desktop has the blue “Windows 10” background, and Icons arranged in rows down the left-hand side.

We already know how to change the Background. Let’s have a look at what else we can do:

Rearranging Icons

Firstly, we want to make sure we are in the right “mode”. We can have Windows automatically arrange the Icons, or do it ourselves.

Desktop Menu
Desktop Menu

Right-Click a blank area of Desktop to get a Menu. If you hover the mouse over “View”, you will see the sub-menu (you can tell that it has a sub-menu from the “>” symbol!). Here you can choose the size of your icons (my advice is to try all three sizes, and go with the one you prefer. You can always change later). You also want to look at the Second section of this menu:

  • Auto arrange Icons – If you select this option, the icons will all line up down the left-hand side, and you will not be able to move them around. Leaving it “unchecked” (i.e. not having a ‘tick’ by the side of it) will allow you to arrange the Icons yourself.
  • Align Icons to grid – You will want this Checked, otherwise the icons will not line up neatly.
  • Show desktop Icons – If you UnCheck this, all of your Icons will disappear! They are not deleted, but you will not see them. Check it, to bring them back.

Now we can get on with arranging the Icons as we like.

As explained earlier, we can Drag’n’Drop the Icons around the desktop. Move them into groups of similar programs (e.g. Word, Excel and PowerPoint Office programs all together), or programs you use at the same time (Scanning programs, photo editors and email client, if you scan, edit and email a lot of pictures!).

Adding and removing Icons

If you do  not have an Icon on the Desktop for a program you would like, it can be added.

The main way of doing this is to find the program on the Start Menu, and Drag a Link to the Desktop:

  • The Start Button
    The Start Button

    Click the Start Button, and find your Program on the Start Menu.

  • Click-and-hold the mouse over the Menu Icon
  • While still holding the mouse button down, “Drag” the Icon to an area of Desktop.
  • You should see a “link” box appear. Release the mouse Button.

Dragging a Link from the Start Menu

You now have a new Icon! You may move this around as you please!

Shortcut Arrow
A Shortcut

NOTE: When you drop your Icon into the Desktop, you should notice that it has a small Arrow in the corner. This denotes that  the Icon is not the actual Program, but a link to it. The Icon may be moved, deleted or altered without having any effect upon the Program!

Note 2: Do Not place Original files/programs on the desktop! The Desktop works best with shortcuts/links to the originals

Note 3: DO NOT keep your DATA on the Desktop! Data is best kept in your Main Folders (Documents, Pictures, etc). If you need easy access from the desktop, the next section shows how to create a Desktop Shortcut to your Data Folders!

Creating Shortcuts to Data Folders

Leaving Data on the Desktop can be a problem for several reasons:

  1. Some Backup methods are only set to back up data from your Documents and Pictures Folders. Any data on your Desktop may not be Backed Up!
  2. Your Computer has to work harder to keep track of all of the Files if they are on the Desktop. Being visible most of the time means the Computer has to keep inspecting them to ensure that the display is correct and up to date.
  3. Files are harder to find if they are not organised carefully. A little time spent creating folders in your Documents Folder (and placing shortcuts on the desktop if needed) will save a lot of time and effort later.
  4. The Desktop can only show so many items, whereas a Folder in File Explorer can be scrolled to show many more items.

The two main ways to create shortcuts to Folders are:

  • Right-Click on the folder you wish to Link. The Menu will have “Send to”. Hovering over this gives a sub-menu with “Desktop (Create Shortcut)”

    Send To Desktop
    Send To Desktop
  • Create Shortcut!
    Create Shortcut!

    Right-Click-Drag the folder to the desktop. You will need File Explorer “Restored”, i.e. not filling the whole screen, so that you can see some of your Desktop. Right-Click the Folder, and keeping the button held down, Drag it out of File Explorer, onto your Desktop. When you release the button, you will get a new Menu, where you can choose “Create Shortcut”.

These methods will create Shortcuts to your Folder on the Desktop, giving your quick and easy access to your Data, without cluttering your Desktop with too many data Files!

Renaming Icons

When a new Icon is created, they often have long names, including a note that they are a shortcut. As we are trying to reduce clutter, and we already know they are a shortcut by the Arrow on them, we are able to rename them.

Shortcut ready for renaming

Using the same tool mentioned in regards to Files and Folders, Icons can be renamed by selecting it and then either pressing the “F2” key on  your keyboard, or right-clicking it, and selecting “Rename” from the menu. This will highlight the Icon Name in blue, and you can type your new name here, pressing “Enter” (or “Return”) to finalise the renaming.

Removing Icons

To remove an Icon from the Desktop:

  1. Shortcut Arrow
    A Shortcut

    ENSURE THAT IT IS A SHORTCUT by looking for the Shortcut arrow!

  2. Click the Icon to Select it.
  3. Press the “Delete” key on your keyboard.

The Icon will disappear.

(It is moved to the Recycle Bin, so you have a chance to get it back, if you made a mistake!)

The End

You can now add, remove and rearrange the Icons on your Desktop, and know about ensuring that only Shortcuts are placed here.

We also learnt previously about taking Screenshots, so why not send me a picture of your Desktop, and let me know why you chose to arrange it like you have!

How to Change Your Wallpaper

What is “Wallpaper”?

The picture that forms that background of your Desktop is called “Wallpaper” (or “Background”). Not to be confused with the pictures or patterns that appear when the computer has been left idle for a while, which is the “Screen Saver(So called because, on older monitors, it helped to prevent “screen burn”, where parts of the monitor would become damaged from displaying the same thing for prolonged periods).

Wallpaper from a Toshiba PC

By default, your PC is probably set with the Windows 10 Standard Wallpaper, as seen above, or maybe it has been set to the Brand of your PC.

Pleasant as these pictures are, it can be nice to personalise your computer, using your own pictures. Maybe you have taken photos of some memorable holidays, or have been sent photos of your family. A son’s wedding, or daughter’s graduation. A new baby, or a gathering of the whole family. You can choose what you get to see!

Personalising

Three Little Symbols

First, I would suggest “Restoring” your browser window, so that you can see part of your desktop while reading this Article (the “Squares” button, top right). Now, right-click on a clear area of the Desktop, and you should get a Menu. The last entry will be “Personalize” (excuse USA spelling!). Click this, and you will be presented with the Background Settings window. (Again, “Restore” this, so we can see everything! If you wish, have a read about using Multiple Programs at once).

Background Settings Window

You can now choose your settings!

The top picture is a preview of your Desktop. Below this is the Menu to choose “Picture” (a single picture of your choice), “Solid Colour” (a plain background) or “Slide Show” (to make your Background change at regular intervals).

Below this are some suggested Pictures, and a Browse button. Also a “Fit” button.

Picture

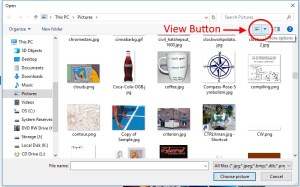
If you wish to use a single picture as your Wallpaper, select Picture from the Background Menu, and then click Browse. This will open a Mini-Explorer for you to find and choose the picture you desire.

"More Options" View Button
“More Options” View Button

Tip: Use the “More Options” View Button to alter the View of the Pictures so that you can see them more clearly! Keep clicking it to see different Views, or click the little down-arrow to get a choice!

Choose your Picture, and click the “Choose Picture” button! The background will change to the Wallpaper that you have chosen!

Wallpaper Shortcut!
Wallpaper Shortcut!

Tip: A different way to do this is to open File Explorer, find your chosen Picture and right-click on it. The Menu that appears will have “Set as desktop background” as an option!

Solid Colour

If you wish your Background to be a solid colour, chose this option, and you will be given a selection of colours to choose from. Or if none of these suit your taste, you can click the closest, and then choose “Custom Colour”, to adjust it.

Slide Show

If you select this option, you can choose a folder that contains pictures, and your Wallpaper will change between those pictures.

The default time for each picture is 30 minutes, but you can set this as low as 1 minute, or as high as 1 day.

You can also choose to “shuffle” the pictures, displaying a random one each time, or leave them in the order they are in the Folder.

You can choose your Pictures Folder, or any other Folder for this.

Some people like to make their own “Wallpapers” folder, and copy specific pictures into it, and I would recommend doing this, as it avoids Windows trying to display pictures that are not meant as Wallpapers, such as very small pictures, or pictures that are not the right shape.

Choose a Fit

At the bottom of these options, is this Menu, offering such settings as “Fill”, “Stretch”, “Tile”, etc.

These are how Windows deals with Pictures that are not the exact same size as the Screen. Why not try a few, to see how they work.

To Finish:

Why not let me know what you use as your Desktop Wallpaper!

You could even send me a Screenshot!

What do you think of the picture I use?

Phoenix Nebula Wallpaper

How To Take a Screenshot

Part of the “How To …” Series

What is a screenshot?

It is a picture of your computer screen. An exact replica of what you can see on your monitor right now.  As if you had pointed a camera at your screen.

Why take a screenshot

There are many reasons to take a screenshot. One that you may come across is if you are trying to explain an error message, or other oddity, on your PC. Rather than muddling your way through unfamiliar language (“I’ve got this sort of box, that says something about cookies”, “It’s a yellow thing with a blue bit on it. Near the top!”), you can take a screenshot, and send that to the person helping you! They will be able to see exactly what is going on!

Other reasons include giving a designer examples of things you find on the web (e.g. if you are wanting your own webpage, or find some jewellery you like, or a house you would like to buy).

Maybe you play games, and want to record your High Score!

How Do I Take a Screenshot?

First, have your screen ready, with whatever you want to “shoot” visible. Remember that the Screenshot will be exactly what you can see on screen!

Now, look on your keyboard. To the right, above the Arrow Keys, will be a set of keys. One of these will say “Print Screen”, or it may be abbreviated to “Prt Scr”. (The key may also have “SysReq” on it. Ignore this. It is a Programmer’s tool that you will not need.)

Print Screen
Print Screen Key

All keyboards are a little different, so don’t worry if your key is a in a slightly different place, or marked slightly differently.

Press this key once.

You will not notice anything happen, but the computer will have taken a snapshot of your screen. A Screenshot!

Advanced

Multiple Windows
More than one Window open

If you have multiple windows open, and are only interested in the contents of one of them, you can either Maximise that window to fill the screen, or you can hold the ALT key (bottom left of keyboard) while you tap PrtScr (“ALT-PrtScr”). This will only put the contents of the Window that has Focus into the clipboard.

Now What?

Paint on the Search menu
“Paint” on the Search menu

The computer has taken a Screenshot, but it is stored in its short-term memory (“Clipboard”).

You will want to move it into a more permanent form.

The usual way of doing this is to open a Picture Editor, and Paste the Screenshot into it.

Windows 10 includes the “Paint” program (or App) for just such occasions!

Click on your “Search Bar”, or hold the Windows Key and press “S”. Type “Paint” without the quotation marks!). A Menu should appear, with Paint at the top. Click there. The Paint program (or App) will open!

Paste!
Paste!

In the top left, you should see the Paste button. This will take whatever is on the Clipboard, and place it in the Picture.

You should now see a copy of your screen replicated inside Paint! It may be a good idea to Zoom out (from the View Ribbon) a couple of times to see it better.

You can now Save the Image, or if you are feeling confident, you can edit it first.

Saving the Image

Save Options
Save Options

Above the Paste Button is the File Menu. Click this, and choose “Save”. You will be presented with some options.

Navigate to the place you wish to save the picture (Click on “Pictures”, on the left). Then click where it says “Untitled”, delete this title, and type your own title (e.g. “Screenshot1”).

It is worth checking what File Type you are saving as. There are many types of Image file!

For most purposes, you will want to use .jpg (pronounced “Jay-Peg”), as this preserves detail, while keeping the File size lower. Click “Save as Type …” and choose .jpg from the list.

Then Click SAVE!

You now have a Screenshot saved into your Pictures Folder!

This is the exact procedure I have used to make the Pictures in this Blog. I have done some minor editing, so that only the relevant parts are shown, but apart from that, exactly the same!

What to do with the Screenshot

Obviously, this depends on why you have taken the screenshot!

  • A picture of your High Score on a game can just be kept for posterity, and shown off when your friends visit!
  • An error message can be attached to an email, or posted in a Facebook Message.
  • Designs can be sent to Designers.

The main thing is that you now have the screenshot!


Why not send me some of your screenshots!

Or let me know what problems you had when trying to!